Quite often we wonder, as humans, how we can improve our well-being. The era of digitalisation has been rapidly developing throughout the years, and we are yet to discover new, amazing things that make our everyday lives more meaningful. This includes the automotive industry, which has been seeking to bring out the most innovative technology to the market for drivers and passengers alike.
However, digitalisation efforts in the automotive industry have not seen much improvement throughout the years. If we take a look at the technology that is available in 2020’s cars, we can not see much difference compared to a 2015 car, for instance. Most functionality has been there for years. Albeit with many improvements, indeed, the full potential is yet to be fully unlocked.
But how can we achieve this? The answer is quite simple: Allocate more resources to research and digitalisation efforts, but also work and contribute to open-source projects.
That’s right. Open source is the answer! It’s been a little over a decade since open source has been present in the software development field and it has forever changed the course of the industry. Discussing the advantages of open source goes, however, beyond the scope of this article. But mentioning open source is important because Android, a popular and beloved mobile operating system, is and has been part of this family ever since its initial release in 2008.
We might be more or less aware of the times when Android gained popularity among mobile phones, or “smartphones” as we like to call them. No doubt that, whenever someone mentions the word “Android”, the first thing people might immediately start picturing in their head is probably a smartphone running Android. But many are not yet aware of the fact that Android has been expanding into something more ever since the rise of smartphones. Android can be run on many embedded systems and this enables a huge potential for a lot of industries, the automotive industry being among them.
The popularity of Android on mobile phones has undoubtedly created a need of this operating system on other devices, such as the in-vehicle infotainment (IVI) systems in modern cars. As expected, this need has been identified by manufacturers and vendors who wish to integrate Android into the car market. This opens a new world in the software development field which pushes the digitalisation efforts of cars more than ever before. Add all the advantages of open source to that and notice the difference.
Indeed, as a result, new and innovative use cases did not cease to appear. It is very clear that users, and especially drivers, want as little physical interaction with the car as possible. In other terms, drivers want to mostly control their cars using voice commands and other means that allow them to stay concentrated on the road.
While it may still require improvement, the voice commands feature has been around for a while, and is a quite well-researched area. We can imagine in the future how you’d be able to control your car using your favorite voice assistant. Amazon, for instance, has already created something that goes in this direction, it’s called “Alexa Auto”.
But I think there has been so much focus on the voice commands to the point that other potential use cases have been, more or less, neglected. Additionally, we can see how this use case does not work at all for people who are hearing-impaired and/or mute. Therefore, we have identified two possible scenarios that are more inclusive towards this category of people:
-
Using a hand gesture detection sensor
-
Using a rotary pad (covered in a follow-up article)
In this article, we will discuss how to expose a hand gesture detection sensor in Android Automotive. We will focus on the different methods used to achieve this.
The availability of gesture sensors is still limited by the time of writing this article. There are a couple of radar-based gesture sensors on the market, but all of them are proprietary solutions and some require extensive knowledge in radar and physics in particular. But there are also quite a few simple and cheap variants, which are simpler to use, but, on the other hand, less accurate. For brevity, we will pick a very simple scenario in which we have a basic APDS-9960 sensor accompanied by an Arduino board.
Let’s assume that the board supports two types of gesture events:
SWIPE_LEFT (0x0)
SWIPE_RIGHT (0x1)
This would be the raw data coming from the server and our final goal is to make sure that we can transfer this data to our user apps lying on an embedded Android Automotive system, for instance to an In-Vehicle Infotainment (IVI) system that runs Android Automotive.
In a traditional Android app, the process would be pretty straightforward, in which we would use the Native Development Kit (NDK) to call native code using JNI. However, this is not very optimal, and each individual user application (project) would require having the NDK.
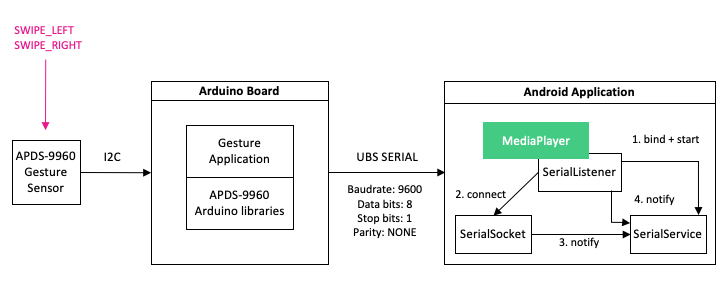
In the above diagram, we can see how the boards would communicate with our Android app, but with Android Automotive, things are going to look a little bit different. It is important to remember that Android Automotive provides some abstraction functionality out-of-the-box, and this can simplify the development.
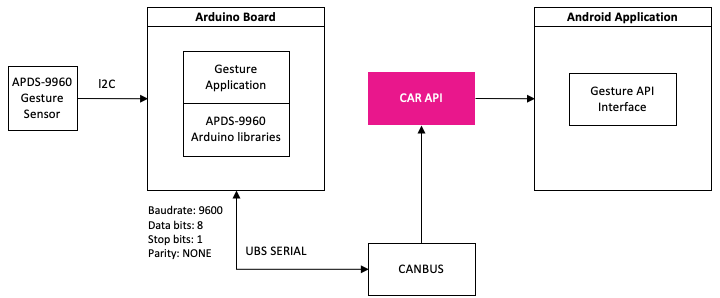
In an Automotive scenario, we have an extra player in the game: it is, you guessed it right, the CAN bus.
CAN (Control Area Network) is a network topology designed to allow microcontrollers to communicate with one another without requiring a host computer. In an automotive context, this allows for a more seamless communication between ECUs. Diving into how the data is transmitted through CAN is, however, beyond the scope of this article. For now, let’s assume that the CAN bus acts as a relay for the raw data signal and we don’t even know what is beyond that. In other words, just some plain 0‘s and 1’s. We don’t know that they’re coming from some basic APDS-9960 sensor.
So how are those tiny little bits going to reach to our end User App and be interpreted as SWIPE_LEFT and SWIPE_RIGHT, respectively? The answer is that there are multiple approaches and solutions.
To be able to understand what we are talking about here, we must have a bit of knowledge about the internals of Android and understand what each architectural layer is about.
System and User Apps have limited access to the underlying layers and this can be a problem in some use cases, where additional access is required. Currently, we know that we have JNI to access the native layer, and from there we can write native code to satisfy our needs. But each and every user has to know how this is done, and using NDK is not very efficient here – in fact, there is so much overhead that it’s a silly thing to do on the long run. This would be the traditional way of achieving our result, and that’s not something we want. We want that each of our Android apps, be it a System or User app, can listen to the gesture sensor’s events without additional code boilerplate. Simply put, we just want to ‘subscribe’ to the methods.
Android now provides new ways to Android Automotive architecture brings to us: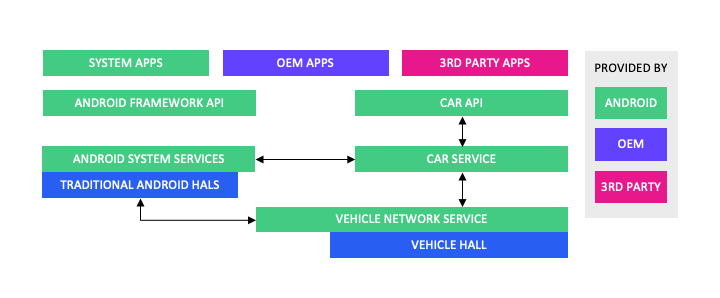
We can observe the following additions:
-
A Car API (Framework Level). This is the “entry point” of the API. It contains all the necessary classes which provide Android Automotive functionality. It contains several important classes, the most important and relevant for this article being CarPropertyManager, which we will talk about a little later. If you want to see the full package list, check out this link.
-
A Car Service. The Car Service is the underlying service which is responsible for interacting with the system services and the network service of the vehicle, respectively. This provides an easy way to access these underlying services and facilitates access to the lower layers.
-
A Vehicle Network Service. Controls the vehicle HAL with built-in security. Access restricted to system components only (non-system components such as third party apps should use car API instead).
-
The Vehicle HAL. Interface that defines the vehicle properties OEMs can implement. Contains property metadata (for example, whether the vehicle property is an int and which change modes are allowed).
The Car API is responsible of providing functionality in which most underlying sensors are accessible at a higher level in the architecture layer.
Let’s have a better look at how this is done using CarPropertyManager, which extends the CarManagerBase class. Other classes that extend this class are, for instance, CarSensorManager (Deprecated, replace!!!), CarHvacManager, CarBluetoothManager, etc. Therefore we can see that several car functionalities can be controlled more or less out of the box.
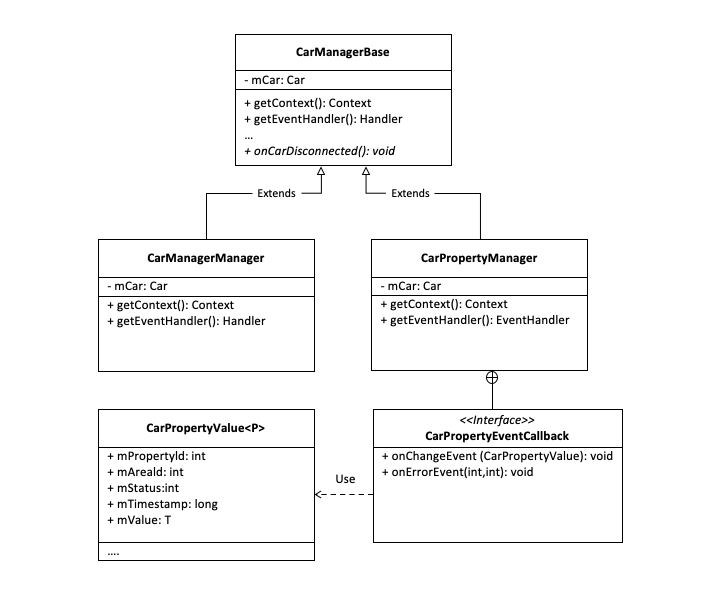
Through CarPropertyManager, static vehicle properties can be obtained by subscribing using the specified property ID. They are obtainable in the form of a CarPropertyEvent callback. The CarPropertyEventCallback interface contains two methods:
void onChangeEvent(CarPropertyValue value); and
void onErrorEvent(int propId, int zone);
They’re pretty much self-explanatory, onChangeEvent is triggered when a property is updated, and onErrorEvent is called when an error with the property occurred. This can be used to listen to particular sensor events.
For instance, let’s assume that we want to pass a SWIPE_LEFT event coming from our gesture detection sensor. If no errors occurred during the process, onChangeEvent will be passed with the appropriate CarPropertyValue. CarPropertyValue holds an abstract type which can be passed as an object containing the value.
So far so good, but this is not the only way to do it. We can also map those 0‘s and 1‘s which we previously talked about to do what we desire using Key Input.
To simplify things, we can map a Key Input Event to pass our events to the Vehicle HAL and CarInputService, respectively.
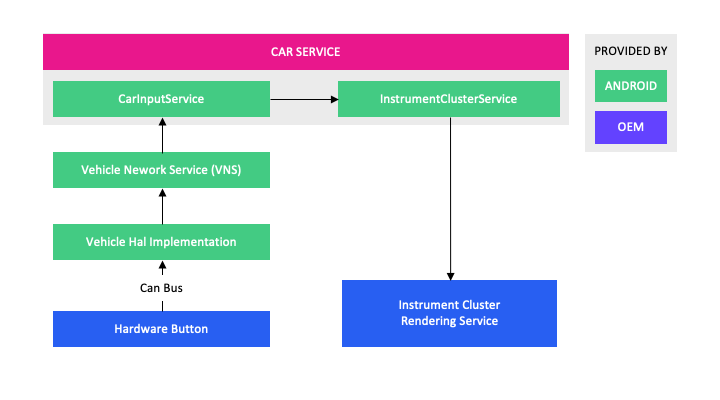
In our case, the “Hardware Button” here would be the gesture data (SWIPE_LEFT and SWIPE_RIGHT), which can be mapped as input actions in our VHAL:
VEHICLE_HW_KEY_INPUT_ACTION_DOWN = 0,
VEHICLE_HW_KEY_INPUT_ACTION_UP = 1,
In our scenario, VEHICLE_HW_KEY_INPUT_ACTION_DOWN translates to SWIPE_LEFT and VEHICLE_HW_KEY_INPUT_ACTION_DOWN translates to SWIPE_RIGHT.
Afterwards, at a higher level, we can handle the event like so:
public class MyClusterRenderingService extends
InstrumentClusterRenderingService {

    @Override protected void onKeyEvent(KeyEvent keyEvent) {
         System.out.println(keyEvent.getAction())
     }
}
This is a simple example of how it would work on an instrument cluster rendering service, but you can use it in any other case.